Good Morning Quilters!
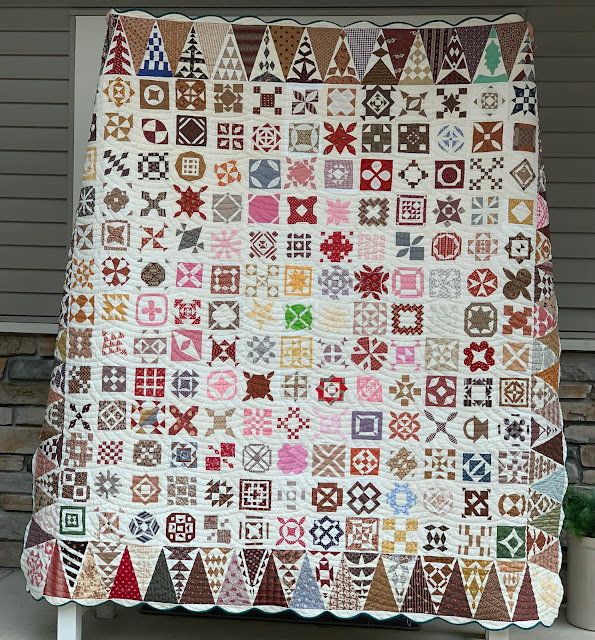
Well, for the third week in a row, I have a completed quilt that was a long in progress UFO to show you. It's a Jane Stickle reproduction quilt.
Pictures of my quilt first, and then the story behind it. First picture: Hubby is holding it up while standing on a bench outside. It is quite large, and he couldn't reach his arms out wide enough to show the corners.
I tried to make my blocks as similar to Jane's as I could. Most of my fun was searching for fabrics to use!
On the couch, ready for me to take a nap underneath it yesterday:
Displayed on the railing by the front door, so I can admire it all this week. I can't believe it is actually finished!
As Paul Harvey used to say.....and here's the rest of the story:
It's probably the most famous quilt in the world. A Jane Stickle reproduction quilt that I've been working on it for a long time. I bought the book Dear Jane by Brenda Papadakis many years ago, when I was a new quilter. It was in 2001, and the 911 attack that September made me more intrigued by all the war stories Brenda told along with the pictures of the blocks. I imagined how Jane Stickle would have felt making a quilt during the terrible Civil War.
Then a few years later, I went to the Bennington Museum in Vermont to see the actual quilt (See info here) I spent a whole day sitting in front of the quilt, taking notes, and marveling at all the different blocks. At the time, we were allowed to take pictures with no flash.
Here is a picture of the quilt on display at the museum:
While at the museum, I bought a poster of the quilt. I had been reading on the internet the progress of many people making the quilt. So I had the book with a close-up of each block, and the poster of the whole quilt. The book doesn't have very much detail on how to make the blocks. All of the internet information I gathered told me people were using a size of 4.5" for the blocks, and they were including sashing and cornerstones.
I was so smitten by the quilt in the museum, that I wanted to make one just like it! So I took my poster to a copy shop and asked them to blow it up to the size of the original quilt. Crazy idea, I know, but I wanted to make mine exactly like Jane's.
And the quilt sized black and white photos of the enlarged pieces, taped together, plus the color pictures from the book, were my pattern for any new blocks I made after I visited the museum and saw the real thing.
It is one of those quilts that you hate to stop working on, you love it so much. And that's the way it was with this one. I have had the 169 blocks finished for a long time, but have never put them together, because I knew that Jane's blocks did not have sashing and cornerstones, and everyone else making the quilt had sashing and cornerstones.
Finally, as a present to myself in my 80th year, I have finished it! The blocks are 5 inches square, and if they were not 5 inches square, I added a little strip of background fabric to make them so. Jane's blocks were all different sizes, and that is what she did to make them fit together.
My scallops are traced from the blown up poster, and my binding is very small. I used bias binding cut at 1.75 inches, doubled as per usual binding, and machine stitched to the front, and hand stitched to the back. I had a friend, Beverly Irvine, machine quilt it in a Baptist fan, as I am not a hand quilter, and it seemed like the least intrusive quilting to use.
So that's my story, and I have no other great finishes to report to you next week. It will be back to making Benjamin Biggs Wedding Quilt squares. And some other projects probably.
Have you started a Jane Stickle quilt? Have you finished one? I know several people who have made many versions of it. I have even started another version, with indigo blue and shirting blocks, and have about 1/3 of the center blocks completed. That version will have the usual sashing and cornerstones, as per most versions. A UFO that is currently in time out.
Tell us what you are working on this week, and show us some pictures. We are always interested in seeing what you are up to. Thanks for joining The Design Wall Monday Linky Party. Click below to join, and don't forget to provide a link back to this post within your blog. Thanks for joining!


