Pages

Monday, December 31, 2018

Design Wall Monday - December 31, 2018

It's the last day of 2018.  Time to reflect and be thankful for the past, and anticipate good for the future.  I just read a book, "The Art of Grace", by Sarah L. Kaufman and one of her suggestions on being full of grace is:

1.  Slow down and plan.  There's no way to be graceful when you're rushing around haphazardly.

Today is a good time to take stock of what quilts I plan to finish in 2019.  Here's a picture of an album block quilt on my design wall, which is one of the quilts I plan to finish in the next year.


How about you?  What are you planning for the new year?

Thank you for linking up with and commenting on Design Wall Mondays this past year!  I so appreciate all of you, and look forward to your pictures and inspiration in the coming year.   As usual, the only request I have is that somewhere within your blog post you link to this particular blog post.  


Inlinkz Link Party

Thursday, December 27, 2018

The Last Quilt Finish of 2018

This post is about a long overdue baby quilt that I had a fight with.  But I won!  Our physical trainer, Kelsie, had a baby last year, and now is pregnant for her second child.  The baby quilt she is just now getting is below:


The trouble started when I selected a flannel backing for this baby quilt.  When I tried to quilt it, the trouble began.  It stretched, and lumped on the back - not pretty.  So I read about flannel, and took the backing off, washed and starched it.  Starched it stiff as a board!  But the washing made it shrink too small to be a backing any more, and I put the project away for a while.  When Kelsie's baby kept getting older, I felt guilty and thought it was time to finish this up.  I bought a cotton backing, and took it to a long arm quilter to finish.  Binding was added, and the quilt is now ready to give away.  Some projects just don't cooperate with me.  But perseverance is my middle name.

Since it is a little late for her first baby's quilt, this quilt is for the baby due in 2019.  And her firstborn sweet girl will receive a little dolly quilt and a little dolly.  Here are more pictures below:


The label on the back of the baby quilt:


The pen is a felt tip one, and is a little blurry to write with.  Any recommendations for a better permanent pen?  Here's one last picture of both quilts and the little dolly.  


Measurements are 40 in. by 50 in. for baby quilt, and dolly's is 10 x 10 in.

This is my first Non Design-Wall-Monday post for quite a while.    I will post again on the last day of 2018, for our usual linkup.  See you then!

Monday, December 24, 2018

Design Wall Monday - December 24, 2018

It's Christmas Eve morning!  I thought I'd show you some of my favorite Christmas scenes from past years instead of what I'm working on this week.  (I've been busy making Broken Dishes blocks and will show them to you next week.)

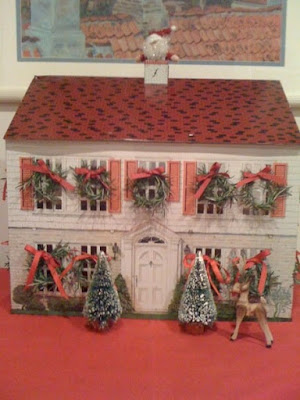
First, here's a "Martha Stewart moment" from a few years back:  I took thyme from my garden and made little wreaths for the windows on my vintage dollhouse.  I put Santa in the chimney, his reindeer waiting on the ground outside, and it all came together as if I had a plan.  The dollhouse is from my childhood, and is probably from 1948-1950.  Decorating it was a one year thing, and I felt very clever.


Next, the Christmas card picture that got the most comments.  Our dog Sally, had puppies just once, and it was such an amazing time for us.  This picture took a long time to take because when they were almost all asleep, one would wake up and wander off....and we'd put him back, and then another would wake up.  LOL  We finally got a few pictures of all seven of them sleeping together.  


The green plaid bows are on the males, and the red plaid bows are on the females.  It was such fun, but a once in a lifetime experience.  They all went to their new homes by Christmas Day.

Third, here's a picture of me with Santa.  He has assured me I'm on his "nice" list again this year, so all is well.


Fourth, a picture of our cabin in the snow.  I'm dreaming of a white Christmas with every Christmas card I write.....but sadly, there is no snow predicted for Christmas here this year.  So I have to rely on pictures of Christmas past. 


Fifth, a picture of my yeast cinnamon roll wreath that I have been making for over thirty years.  It's from the Betty Crocker cookbook, and I only make it at Christmas time. 


And lastly, a picture of Sophia Grace and Rosie in their Santa hats.  They stay in my sewing room, and keep me company while I make doll quilts.


Merry Christmas from me to you.  I hope your Christmas is merry and bright, and your new year filled with quilts!

I so enjoy the Design Wall Monday link up.  Please link up and show me what's on your design wall.  The only request I have is that you refer back to this particular blog post somewhere within your blog post.  Thanks!  

Note:  Since InLinkz has changed the format of their link up, some people have not been able to link, and I'm sorry for that.  However, I am not a techie, and don't know what to do to fix the issue.


Inlinkz Link Party

Monday, December 17, 2018

Design Wall Monday - December 17, 2018

How are you ladies coming along on Bonnie Hunter's mystery quilt (those of you who are doing it)?  I have been saving the clues and following along.  It sure looks interesting, as always.

But my week has been spent making more hsts and broken dishes blocks.


The quilt I want to make will be king sized, for our bed, and this week, I looked at the "big picture" of how many hsts, how many broken dishes blocks, and background blocks I will need.  Again, here's a picture of the vintage quilt I am using as a guide:


This is the point where I sometimes put a project aside, and say "I can't think about that right now, if I do, I'll go crazy.  I'll think about that tomorrow."  in my best 'Miss Scarlett O'Hara' imitation.  But this time I haven't.....not yet. 

I made a spreadsheet to look at how many parts are in each block if I divided the 100 x 100 inch size into 25 equal "blocks".......Below i a drawing a friend, Rosemary Youngs, drew up in quilting software, of a 20 inch by 20 inch "block"


There are a couple of hsts flipped the wrong way in this picture, but it's not important at this stage.  Since I am not a quilt designer, and have an accounting background, my quilt "plans" are usually spreadsheets in Microsoft Excel.  My spreadsheet tells me I will need 1,300 broken dishes blocks.  That's a lot, but then I said, o.k......how many should I make a day?

Each of the twenty five blocks in my plan are 20 inches by 20 inches, and have 52 of the little broken dishes blocks in each.  I am dividing this project into twenty five parts, but I want my fabrics which are scrappy to be in each of the blocks.  Which is why I would prefer to make all the broken dishes blocks first, before I assemble a single 20 inch square block.  This way, I can make a batch of 25 broken dishes blocks - all the same - but only one or two of each batch  would be in each 20 inch square block.  

So the method would be dividing the broken dishes blocks (2 inches square) production into units of 50 at a time.  Then use only two of these 50 in a 20 inch square.  So there would be production of 50 broken dishes blocks 26 times.  

Yesterday, I experimented to see how many broken dishes blocks I could make in one day.   Starting in the afternoon, after church:  Using triangle papers, I sewed 200 half square triangles.  Then cut them apart, removed the papers, ironed them open, and trimmed them to 1.5 inches by 1.5 inches.  Next I sewed 100 of them into "twos" and "twos" and now have 50 of the "twos" and "twos" sewn together for 25 complete broken dishes blocks.  50 were in the "two" and "two" status when I went to bed.  The second 100 were pressed open but not trimmed to the correct size.  From the time spent and progress made so far, at bedtime, I determined I could sew 50 broken dishes blocks in two days, but not one.

I had made 150 broken dishes blocks before I started this "big picture" spreadsheet, and after another day at it to complete the 50 above, this would make 200 complete and 1,100 more needed.   At 50 per batch, that's 22 batches.....each two days long.  44 days of sewing hsts and sewing them into units of four..... yikes......but the Bonnie Hunter mystery quilters are making large quantities of the same unit over and over, so it is being done.  I do have all of the plain background squares cut (1,000 of those) so that part is done.  If anyone wants a copy of my spreadsheet, I can email it to you.  

But this morning, I'm going to look at Design Wall Monday linkups and see what you are making!  And after all, tomorrow is another day.  Design Wall Monday linkup rules are simple - just refer back to this particular blog post somewhere within your blog post.  Thanks!  I really enjoy seeing what you are doing and I thank you for joining in each week.  
Please note that InLinkz has new format, and I may not be doing it right, so I may have to fix the below link.....but I hope it works o.k.  I'm not a techie 

Inlinkz Link Party

Monday, December 10, 2018

Design Wall Monday, December 10, 2018

Donna, a reader, asked for information about my header quilt.  Here is what I wrote about it back in 2013.


The quilt measures 22 x 35 inches and the squares are one inch.  It is a memory of the fun I had as a child, sifting through the buttons in my Mom's button box, and was made the year after my Mom died, in 2007.  I had seen one in a button shop in St. Charles, MO, years ago, and this is a copy of that quilt.  I found this picture below on the web, and it may be of the quilt from the shop in St. Charles, Mo.  I don't know for sure.


It is quite heavy, so I haven't hung it on the wall, but I usually put it over a table top, for display.  I had fun picking out old buttons from Mom's button box to sew onto this quilt.  Hope those of you who haven't heard this story enjoy it, and for those of you who have heard it already, I hope you enjoy it again.  When you are old, like me, any story is a new one, because I can't remember hearing it before.  

Here's an old picture of our beloved Sally, sitting near it when I was first photographing it, back in 2013.  She was pure love, and we miss her.


And here's a picture of Penny taken yesterday, in her "down" position, watching me sew on the sewing machine.  After about 20 minutes, I stop and let her move around, as she is still a puppy.  Here she has a look on her face that says "Why would you want to sew on that sewing machine instead of playing catch with me?" 


This week I will be able to spend more time looking at design walls.  Yeah!  I so enjoy seeing what everyone is making.  The link up rules are simple - please refer back to this particular post somewhere within your blog post.  Thanks!


Monday, December 3, 2018

Design Wall Monday - December 3, 2018

This week, I'm making small broken dishes four patches.  Here's a picture of two of them - front view and back view.  I like the little tiny four patch in the middle of the backside.  Too cute.  The block measures 2 x 2 inches finished.


I've made about 50 broken dishes four patches completely, and have several more partially made.  I have decided to make a quilt for our bed (king size) so it will require a ton of these blocks.  I'm not thinking about how many I have to make in total - I'm just enjoying the making for now.


Here's another picture of the old quilt that I am using as inspiration:


We have Penny back from training - she was away for a month of "boot camp".  She is like a new dog - obeys commands, sit, down, and best of all something called "place", where I tell her to stay in a certain place, and she does!  They worked with hubby and with me for about two hours to train us in what she has learned, and it was totally worth the separation to have her come back so well trained.  Now we, as her owners, must be consistent in keeping up their good work.  Wish me luck!

What is happening in your world today?  I am looking forward to seeing your design walls.  Thanks for participating.

As usual, if you would like to link up, please refer back to this particular post somewhere within your post, and that way people can link back to Design Wall Monday to link up with the next blog on the list.  Thanks!  Happy December!


Monday, November 26, 2018

Design Wall Monday - November 26, 2018

At this time each year, I like to watch the mystery quilt unfold at Quiltville.  I am saving the clues and may make it after I see what it looks like in the reveal.  It will be interesting to see how many of our Design Wall Monday bloggers are joining in the fun.  Are you?

Last week at retreat, some friends gave me lots of small triangles that were snipped off blocks they were making.  They know I like to make small quilts, and also large quilts with small pieces, so this is what I've done with them so far.  I sewed on the long side of the triangle for those pieces that had good contrast between the two pieces: 


I've found that if there is not good contrast between the two pieces in a small hsts, the work of sewing two very small pieces together is unnoticed.  Here are some of the triangles that will be sewn with a fat quarter from my stash to provide better contrast:


These hsts will finish at one inch square, and will probably be used in a replica of this quilt, which has lots of broken dishes four patches made of hsts.


There would be over 1,000 hsts in this quilt, if I made it large enough for our bed.  Maybe a miniature quilt will be what I make!   For now, I'm having fun making hsts.  What are you working on today?

I always enjoy seeing your design walls, and I thank you for participating.  You bloggers make my life richer.  Please refer back to this particular post somewhere within your blog post.


Monday, November 19, 2018

Design Wall Monday - November 19, 2018

Thursday is Thanksgiving in the United States.  I have a lot to be thankful for this year.  

I just returned home from a wonderful retreat in Shipshewana, Indiana.  While at the retreat, I saw a vintage quilt that was made of broken dishes blocks, and it was such an interesting quilt.  Do you like it?


Here are two pictures of the Farmstead Inn, where we stayed.  The first picture shows Christmas lights from a display across the street, with the Farmstead Inn in the background. 


The second picture shows the Farmstead Inn with the lovely snow that came down while we were there.  It was just enough to look pretty, without causing slippery roads when our retreaters were leaving to go home.


The retreat is filled each time with such wonderful quilters, and they are all full of laughter, care, and love.  It fills my heart up.

What fills your heart with joy this Thanksgiving season?  I look forward to hearing from you, and seeing pictures of your design walls.  The instructions are the same each week; Please refer back to this particular blog post somewhere within your blog post.  I am thankful for you and your participation each Monday.


HAPPY THANKSGIVING


Monday, November 12, 2018

Design Wall Monday - November 12, 2018

Today is Veterans Day in the United States.  There are, according to the History Channel, 16.5 million living veterans who have served in at least one war, and 5.2 million living veterans who have served in times of peace.  Thank you to all of our veterans for your service and sacrifice. 

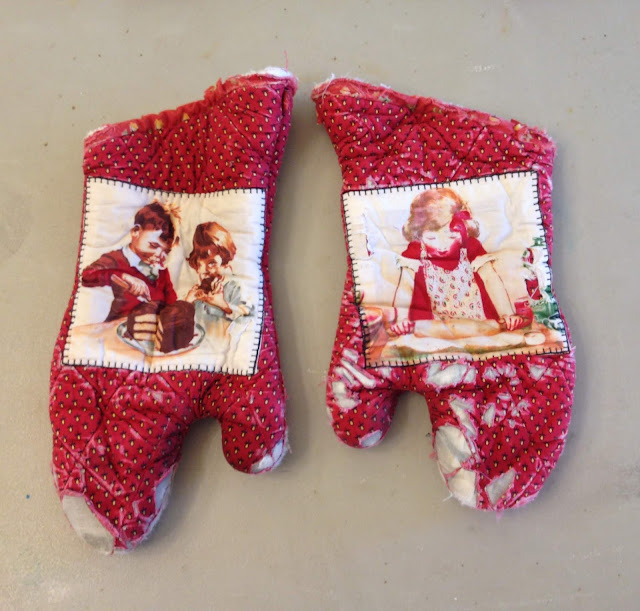
While visiting our daughter last week, I made replacement oven mitts for some I made for her a few years ago.  I made a bunch of these for Christmas presents back then, and our daughter was my "tester"  for size and padding advice.  Here are the the old ones, which were well worn:


Here are the replacement oven mitts that were finished while I was visiting her:


She is an expert zippered bag maker, and I am afraid of zippers.  Soooo, she helped me make a zippered bag, and showed me several tutorials on the Internet that I can follow to make more of them.  I am now slightly less afraid of zippers, thanks to my dear daughter.  Thank you Christa!  This little "doggy" bag will stay in the car with treats for our dog, so I will not forget to have rewards for Penny on car trips.  I think it is so cute!!! and I put the zipper in by myself!!!


When I returned home, I worked on finishing a little nine patch doll quilt that I had asked you for opinions on a few weeks ago. (in this post)  Most of you liked the on point setting, and the cheddar print for sashing or alternate block.    But I couldn't ever decide on what I wanted for cornerstones, so I tried a different sashing that didn't require cornerstones.  However, I found it does involve many partial seams, and I would like to find an easier way to do this "basket weave" sashing look.   Maybe pressing the sashing edges under, and weaving it first and then sew it to the nine patches by hand.  Anyone tried it, and have any tips?

It measures 12.25 inches square and the nine patches are 1.5 inches finished size.  Sophia Grace and Rosie are very pleased with it.


I do like how it looks, and have bound it without quilting it, as I am not sure what color thread to quilt it with, and where to put the quilting.  Maybe I will leave it without quilting, as it is a small doll quilt.  Too many decisions for my brain this week.

I cut the bias binding at one inch wide, not thinking about what I was doing.  I had planned to only single fold it, but still, one inch is too narrow.  I made a note to myself to use only down to 1.25 inch single fold binding in the future, as my limit to smallness in doll quilt bindings.  Here's a closeup of the binding:


What are you working on this week?  I so enjoy looking at your design walls...so many interesting projects going on.  Thanks for participating.  As usual, I ask please that you refer back to this particular blog post somewhere within your blog post.  


Monday, November 5, 2018

Design Wall Monday - November 5, 2018

November already!  October is in the rear view mirror, and Thanksgiving is ahead!

I hope you all had fun on Halloween.  For those with little ones, who celebrate Trick or Treating, I hope you had fun handing out candy and helping them eat candy.  I didn't even buy any candy because kids don't come to our door on Halloween, and I end up eating all the candy.   We are near the end of a cul-de-sac in a subdivision where the homes are far apart, so the children knock on doors in greener pastures.

Here is a picture of four Halloween pillows on the couch in the living room:


I made the orange pumpkin head pillow, and bought the other three.  I copied the black kitty pillow's smile on my pumpkin pillow.  The ghosts that I call "Kasper and The Mrs. Kasper" were from the Hallmark store years ago, and are very soft fabric and light weight.  I have to make sure that our labrador retriever, Penny Lane, doesn't decide that they are dog toys.  She seems to think everything on earth is for her pleasure.  LOL

The main fall season quilt that I get out each year is called, appropriately "Third Weekend in October", pattern by Ruth Powers:


I know I have blogged about it before.  It is a large quilt that is 85 X 110 inches.  I leave it out until after Thanksgiving and enjoy it every year.  All paper pieced, and I would never do it again, but I did it with a friend who was making her version also, so we cheered each other on.  I am not fond of paper piecing, as I have trouble visualizing where to put the fabric before sewing the pieces.

It is also the only large quilt that I have ever free motion quilted.  I don't even remember how I did it, but at the time, I was in the groove, and quilted "veins" in each leaf, on my domestic machine.


This week we are visiting our daughter and her family in Texas, so I wrote this post before I left town, and scheduled it to post on the morning of November 5th.  I will arrive back home on the evening of November 5th, and I look forward to viewing all of your lovely design walls then.  Thank you everyone who links up with Design Wall Monday.

What have you been working on this week?   When you link, please provide a link back to this particular blog post somewhere within your blog post.  Thank you for following my request.  


Monday, October 29, 2018

Design Wall Monday - October 29, 2018

My trip to Virginia was wonderful, and here is a picture of my design wall, with the blocks that I received from the others in the Churn Dasher's group.  I put some subtly striped pink yardage behind the blocks to audition it as a possible sashing/background squares:


They will be on my design wall for a while as I want to admire them.   I love the fabrics the others chose for me.

When I got back, I started working on binding the scalloped edging for a quilt that I recently received back from my longarm quilter.  The quilt is "Hearts and Apron Strings", and I blogged about it (HERE)


The binding is cut on the bias, and I made it 2 inches wide, double fold,  so it shows only a narrow touch of light green:


My friend Joan Brink was visiting Thursday night, and taught me that there should be a little "crease" in the middle of the narrow part between the scallops, and that I should tack that crease shut on the front and the back:


I am practicing on this quilt, as my Jane Stickle quilt that is waiting in the queue to be finished also has scallops at the edges.  Some of these scallops have a nice crease in the narrow part.....and some do not.  But I am getting better at it.

Fall is so beautiful this year in Michigan.  Here is a picture of two maple trees in our front yard:


Aren't they beautiful?  I feel so blessed to see them every day. 

What is on your design wall?  I am sorry I wasn't able to read every linkup post last week, but this week I will be reading and commenting.  Tell us what you are working on, and show us a picture!  We want to see!  All I ask is that you refer back to this particular blog post somewhere within your blog post.  Thanks so much.


Monday, October 22, 2018

Design Wall Monday - October 22, 2018

My design wall today has a new doll quilt made as a replica of an old one in the Metro Museum of Art.  I am writing this post Sunday afternoon, because on Monday morning, I will be flying to Virginia to meet with the Churn Dashers.

Here is a new doll quilt top, which now measures 21 by 21 inches, before quilting and binding:


The blocks finish at 5 inches square, and the measurements to make the block are as follows:

The larger block, which I talked about last week, finishes at 10 inches square and is explained (Here).  I took those measurements and modified them to make a 5 inch block.  The outside three triangles on each side of the block and the four corner triangles are where I wanted a little "wiggle" room in case my seams weren't exactly 1/4 inch, so those pieces are cut a little bit bigger, and hopefully, there will be no problems when trimming it to 5.5 inches at the end.

Colored fabric for the ten chimney "bricks"  
Two pieces 1 3/8 by 3 1/8 inches
Six pieces   1 3/8 by 2 1/4 inches
Two pieces 1 3/8 by 1 3/8 inches

Background Kona Snow pieces:
One piece 1 3/8 by 3 1/8 inches 
Two pieces 1 3/8 by 1 3/8 inches
The above three pieces form the center "cross".
Background Kona Snow edge pieces:
To create the twelve side triangles:
Cut three squares 2 1/2 by 2 1/2 and then cut them from corner to corner twice, giving you twelve triangles with the straight of grain on the outside longer edge.
Corners:
Cut two squares 1 3/4 by 1 3/4 and cut them from one corner to another, yielding four triangles with the straight of grain on the two shorter sides of the triangle.

Assemble the block as per the pictures at the link above, and trim it to 5.5 by 5.5 inches.

The inspiration doll quilt that is in the Metro Museum of Art was made in 1852 by Ella Mygatt Whittlesey.   It is completely hand stitched and quilted.  Also, Ella was seven years old when she made it, just a few years younger than this 75 year old blogger!  Her quilt measures 26 x 24 3/4 inches.


Here's also a closeup of one of my five inch squares.  I used the stripe in the opposite direction as I did on the ten inch block of the same fabric (see last week's blog post pictures).   As you can see, my outer corners of the colored parts are getting cut off a little bit in the seams, so I hope the addition of "wiggle" room in the measurements I give you above will eliminate that.  If you make nine blocks, and they all trim to the same size, it doesn't matter if they are 5.5 by 5.5 or some other measurement close to that.  After all, it's just a doll quilt.   So easy a seven year old can make it!


Well, what's on your design wall this morning?  It has been so noice seeing all of your design walls.  What's "noice"?  A new word this week spoken to me by a grandson.  It means "Beyond the boundaries and exceeding the limits of nice.  Spoken with emphasis when describing something particularly awesome."   That fits your links to my blog.

If you'd like to linkup, please mention this particular blog post somewhere within your blog post.  Thanks!


Monday, October 15, 2018

Design Wall Monday - October 15, 2018

This week I have something on my Design Wall!  Yeah for me!  I'm getting ready to exchange Chimney Sweep blocks (also called Album Blocks) with my fellow Churn Dashers in Virginia.  I am making four blocks each for eight different individuals, so 32 blocks were made this week.  I love this block!  It went together beautifully.

Here is a picture of the 32 blocks on my design wall.  They are 10.5 by 10.5 unfinished size (except for the little one at the top, which I will talk about later).


Closeup of two of the blocks:


It's a great block to show off stripes and beautiful civil war repros, and I can't wait to see the blocks I will get in the exchange next week.  Patience is not one of my virtues.

If you would like to make this block, the directions are on the internet in several places.  This block finishes at 10 inches, and I used the tutorial/directions found (Here)  For our block exchange, we are using Kona Snow for the white parts.

Did you notice the little block at the top of my design wall?  I had to try a small block, that finishes at 5 inches.   I made that one because I needed a break from all of these big 10 inch blocks.  I am so used to making small blocks, and it was fun to make this one.

To make a block  1/2 the size of the directions, all you have to do is follow these three steps:

(1) subtract 1/4 inch from every side of the big block directions for each piece that is in the block.

(2) divide the resulting measurement in half.

(3) add back 1/4 inch to every side of the new smaller directions.

Next week,  I will give you the directions for the smaller size, if anyone is interested, as I've already done the math......and some quilters don't like math.

What's on your design wall this Monday?

Please link back to this particular blog post somewhere within your blog post today.  Thanks!


Monday, October 8, 2018

Desgn Wall Monday - October 8, 2018

This was a good week for quilting.  I  started on some chimney sweep blocks that I'm making for an exchange with the Churn Dasher group in Virginia.  Here is the first completed block:


This block will finish at 10 inches square, and it's important to cut the outside triangle pieces so that straight of grain is on the outside edges of the whole block.  Otherwise, it would have a tendency to stretch out of square.

I made this sample block to be sure of my cutting and sewing measurements for the block.  After this one turned out just fine, I have cut the white parts for the remaining blocks.  Today I will have fun "shopping" in my stash for the dark and medium fabrics to make the rest of the blocks.

Here is the way I assembled it:  First I laid it out on a mat, in the way it would be sewn.  I sewed each row, returning the completed rows to the mat, to keep the block in order on the mat.  I left the corners for later:


Then I sewed row to row to row.  The four corners were the last parts to add to the assembled block:


It is now trimmed to 10.5 by 10.5, and I am working this week on the rest of the blocks.  I should have them all on my design wall next Monday to show to you.

It's fresh apple time here in Michigan and today I made an easy apple crisp.  It is cooked in the microwave, for 6-7 minutes, so is very easy to make.  Recipe is on the internet:  (microwave apple crisp recipe)  I don't cover it with wax paper, but the rest of the instructions are very similar to my old recipe.


Yummy!  Well, that's what's going on here......what's going on at your house?  What is on your design wall this Monday?  I can't wait to see all the pictures.

You know the drill, please refer back to this particular blog post somewhere within your blog post.  Thanks!