Pages

Monday, February 27, 2017

My Goal Is To Stay "Whelmed"

Have you ever been overwhelmed?  Underwhelmed?  I like to be submerged deeply in quilting, but not over-stressed with my projects, nor the opposite feeling of being uninspired and unmotivated.  Neither overwhelmed nor underwhelmed.    It is a balancing act for me, and I am working on several projects at once.  It keeps me whelmed.  

I made a doll quilt using hsts that were left over from the Churn Dashers group project last year.  It went together quickly, and I am ready to machine quilt it and choose a binding.  It will finish at 15 inches square.


The pattern is "Soaring Triangles" from the book "Sew Charming" by Mary Etherington.  I had small triangles already made, so I used the size I had, half square triangles that would finish at 1.25" by 1.25".  I put the hsts in order on a mat (used the back of another small quilt) in design order, carried it to the sewing machine, and chain sewed the columns together. Here's a picture mid process of sewing columns together:


Here's what it looked like with columns chain sewed together, but with rows not sewn yet:


Then I sewed row to row together, and made the doll quilt top in one day, easy peasy - lemon squeezy. But easier to do on this small project than on the large quilt that I'm showing you next.

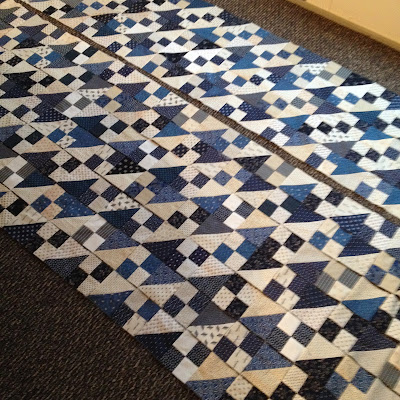
I am finishing a large quilt by sewing (chaining) the completed columns together, then sewing the quilt together row by row.  It's necessary, but underwhelming.  I do two rows a day, with lots of pins and pressing of seams.  I am looking forward to making a doll quilt to match it, which will go much faster.


I will talk about this quilt more when I finish the top.  I love blue and white quilts, and bought a kit for this one at the Grand Rapids AQS quilt show.

I also prepped baggies of 1.5 x 1.5 inch squares for future grids of the Valentine's Day quilt that was started last week. This one:


I want to be able to pull out a 10 x 10 grid baggy or two and complete them occasionally, with the goal of having the wall hanging finished next February.  I have all the red squares cut, and haven't bagged up the neutrals/shirtings squares yet.


Hubby is leaving for his annual men's golfing week in Florida with 21 other men equally passionate about golf.  I am contemplating a week of intense quilting while I am here without him.  I will try to stay in the groove, not overwhelmed, and not underwhelmed with my projects.  Are you having success with this?

Design wall Monday (Here)


Monday, February 20, 2017

Quilts - Finishing One and Beginning Another

The design wall has a newly started Valentine's Day quilt on it:


This picture was from the Internet - (Here)- and the printout was in my quilting notes, and I wanted to see what it would look like as a quilt.


The bottom wording may change when I get to that point.  But the picture already had grid lines, so I cut squares of fabric and began to make it. 

The red is a constant because I have a lot of it, but the shirting is from scraps. The picture is divided into about 60 grids, and I have finished 8 this week.  It is a very peaceful project, and I like having a new Valentine's Day quilt in process. There are 100 squares in the center larger grids (10x10) and less in the smaller outside grids.  The process is as follows:  (1) cut the squares (1.5 x 1.5 inches) which finish at 1 inch square.


(2) lay out one grid of squares (following the picture)on a portable piece of fabric (I used the back of one of my doll quilts):


(3) sew columns together in a "web", as I have these two on the right:


(4) sew the webbed columns together, row by row.  I leave the whole thing attached so it stays in order, and sew row 1 to row 2, etc. on down the piece.
When the rows are sewn, the two right pieces will be the same length as the ones on the left side of the picture.

(5) put each assembled grid on the design wall to see how it is progressing.

(6) Smile and do a little happy dance and start another grid.  I enjoy the process.  I usually work on two grids at a time, using them as leaders and enders going through the sewing machine, so there is not wasted thread.

Here's more Valentine's Day pictures from my home.  The newly completed quilt top is on the back of the living room couch.  By popular consensus, it will not have any borders, and will be bound in solid red binding.  I'll post another picture after it is back from the machine quilter, but she won't get to it until June.


The front door has Valentine Hearts to greet you, which I'll keep there until March:


What are you working on this week?  I'm posting a picture of my design wall at Judy Liquidara's blog, as I like to look at all of the pictures of other quilter's design walls, and see what they are doing. (Here)

Monday, February 13, 2017

I Love Valentine's Day - Reprise

A few years ago, I started a quilt as a February "Valentine's Day" project, but stopped working on it when I ran out of the toile fabric.  Later, I bought more of the fabric, but then we moved, and the project got boxed up.  So this February, it's on the design wall, and I am putting rows together.  It feels so good to be moving a project along to the finish line.


I searched my blog, and found that I started this quilt in 2014.  Here's the blog post:  I love Valentine's Day

I have 9 blocks by 9 blocks made, and the quilt will be about 95" by 95".  Here's this week's picture:


I posted a picture on Facebook and Instagram, asking if people thought there should be a red border, a toile border, or no border.  I am binding it with the solid red, regardless of the border decision.  Now that I'm looking at it, I may want to make it into a king sized quilt for our bed, in which case, I will add another column, and another row, or do a border.  Lots of people like it with no border, which would involve 19 more blocks, but only half of them would be any work.  What do you think?

Colleen Lim, a friend from the Shipshewana retreat I attend, asked me about the pattern.  I made it up, and will write a tutorial on the measurements, tips, etc.   I will post the directions here for Colleen, and anyone who wants to make their own Valentine Quilt.  

Through the years, I've saved Valentine's Day cards from my husband.  This year I put some of them on the fireplace mantle in the living room, and the rest of them on our dressers in the bedroom.  I told him to "shop" in our home supply of cards, and pick out one to send to me again this year.  

It is a wonderful collection of cards through our long married life, and I love seeing them again.  Do you save cards from your sweetheart?


Happy Valentine's Day tomorrow!  This little doll quilt is on my coffee table this year.

Today is Design Wall Monday at Judy Liquidara's blog, so I'm heading over there to see other quilter's work.  Judy has some cute little girl's dresses on her design wall.  (Here)


Wednesday, February 1, 2017

February, A New Month to Enjoy

Good morning!

Last month, we took a long car trip to Corpus Christi, TX to visit family, and while I rode along, I took a pad of graph paper, and drew out plans for some doll quilts I'd like to make in the future.  Today, I'm sharing the plans and pictures of the first one I made after we returned home.

Here's the drawing for a doll quilt. 


It is a 9x11 inch quilt with six small stars.  The stars finish at 2 inches, and I planned the corners to gently curve, as I've seen on some old doll quilts.  I imagined it in all one color stars on a shirting background.  Wouldn't cheddar stars be great?

Well, I've been cutting and organizing scraps into shoe boxes full of small squares.  I pulled out a shoebox and began laying out bits of fabric.  This box had half square triangles in it too.  Since it was easy to use 2 hsts instead of a flying geese block, six stars were planned out on a piece of flannel, and then carried over to the machine, and sewn together quite quickly.  The box had only unfinished 1.25 inch pieces in it, so I revised the quilt size to fit the squares I was using.  If you think of the star as divided into a 4 x 4 graph grid, the center is a 2 x 2 grid, the four outside corners are 1 x 1 grids, and all the rest can be 8 hsts, or else 4 flying geese.  Hope this makes sense.  So I used 2 x 2 inch squares for middle of star, eight 1.25 x 1.25 hsts, and four corners of shirting 1.25 x 1.25 inches.  It would have been a lot harder to make if the hsts weren't already made.  I used whatever I had, trying to get a star in mostly the same color.


When the top was together and I added the borders, I quilted it and added the binding, completely forgetting I had planned on rounded corners.  Oh well, that's what happens when you are old....you forget some original plans.  I do like it.  It measures 13 x 17 inches.

But I still wanted to make it as drawn up - with rounded corners, and in the smaller size with one color stars.  So, since we had a short car trip coming up last Sunday, I took my little lap cutting board, and a bag of scraps with me.  I cut enough blue and shirting fabric to make six sets of four flying geese using the "no waste flying geese method".  You can google it and get the instructions.  I also cut the centers for the stars, 1.5 x 1.5 unfinished size.

When home, I cut the star corners, and decided to cut them 1/4 inch larger than needed.  This helps me in two ways.  1) Making them a tad bigger helps me pick them up and place them while sewing, and 2) when trimming the completed stars, it gives me a little wiggle room in case my seams are a little crooked or not exactly 1/4 inch.  So the corners are cut 1.25 x 1.25 (and finish at .5 x .5)  The flying geese finished size is 1.5 x 1 inch.

Here's a picture showing one trimmed star and 3 untrimmed stars.


Here's the quilt top, ready to quilt:


I put a round glass on the corner and drew a pencil line to get the corner curve.  The binding is cut on the bias to help with the curves.  I didn't follow the written directions for borders, just eye-balled it on what looked good.   It will measure 10 x 12 inches when finished.

If you make a little quilt with these instructions (any size) I would love to see it.  
Hope you are having a nice start to February too!  Spring is coming!